Creating custom language plugins
Wrattler is a polyglot notebook system that can be easily extended to support new programming languages and data exploration and analysis tools. Wrattler is browser-first, meaning that it does as much work as possible in the web browser. If you use Python or R, Wrattler needs to call an external service to run your code, but if you use JavaScript (and other browser-only components), then Wrattler can run fully in the web browser.
In this tutorial, we look at building browser-based plugin for Wrattler. We will implement a simple Wrattler extension that defines a new kind of notebook code block with custom (HTML) user interface. The extension does not do anything useful. It lets you concatenate one or more data frames defined earlier and export the result as a new data frame. However, it illustrates many of the aspects of Wrattler.
The following shows our new Wrattler code block, letting the user choose from
existing frames one, two and three, and specifying new name for the
resulting data frame.

The technique described in this tutorial is suitable if:
- You have a programming language that runs fully in the browser, or if you want more control over how an external service is called to evaluate code.
- If you want to create your own user interface, rather than just use a standard code editor with tabs showing previews of evaluated data frames and figures.
- If you are writing custom tool that is not a programming language in the usual sense, but is something more interactive that requires more control over how the code block works and looks.
If, instead, you want to add a support for a programming language that runs on the server, like Python or R, and you want to reuse standard look of Wrattler code blocks, then you probably want to create an external language runtime services
Step 1: Creating Hello World plugin
In the first step, we’ll create a plugin that adds a new kind of code blocks. When
you add a code block using this plugin (or language), it will just display
"Hello from merger!", but it will not do any data processing. I call the
tool “Merger” because it lets you merge data frames.
Building Wrattler and adding a new file
For simplicity, we assume that the work is done by directly editing the
main Wrattler repository. For
instructions on how to build and modify that, see the development notes
guide. Now, the next step is to add a new TypeScript
source file. The source code for the Wrattler web components is located
in the client folder. There, you can find existing language plugins in
src/languages. In this tutorial, we put the implementation of our plugin
in src/demo/merger.ts.
To start, we will need to import Maquette, which
is a virtual DOM library that Wrattler uses for user interface, Md5 function
for hashing and three other components of Wrattler:
import * as Langs from '../definitions/languages';
import * as Graph from '../definitions/graph';
import * as Values from '../definitions/values';
import { h } from 'maquette';
import { Md5 } from 'ts-md5';
The three Wrattler components we are importing are described in the API documentation:
- Languages module defines API for creating language plugins
- Graph module provides types for working with the dependency graph
- Values module contains types used when evaluating notebook blocks
Creating simple code block editor
Wrattler uses the Elm architecture for implementing its user interface. If you are creating a plugin that defines a custom user interface, then you’ll also need to use this approach in your language plugin. Wrattler provides a couple of functions to make this easier, so you do not have to implement the whole user interface from scratch. We will look at those in Step 4.
In the Elm architecture, you need to define type representing state and a type representing events that can happen in the application. You then define two functions:
rendertakes the current state and renders the user interface using a virtual DOM library.updatetakes the current state, event that occurred and calculates the new state.
When implementing language plugin, your state type needs to implement the
EditorState interface
and store unique id of the code block together with a Block object, so a
state with no extra features and empty event type look as follows:
type MergerEvent = { }

type MergerState = {
  id: number
  block: Langs.Block
}
An editor then needs to implement the Editor
interface. In the following, the update function returns the original state; the
render function returns constant HTML and we also need to add an initialize function
that takes the required parameters and stores them in our MergerState:
const mergerEditor : Langs.Editor<MergerState, MergerEvent> = {
  initialize: (id:number, block:Langs.Block) =>
    { id: id, block: block },
  update: (state:MergerState, event:MergerEvent) =>
    state,
  render: (block:Langs.BlockState, state:MergerState,
           context:Langs.EditorContext<MergerEvent>) =>
    h('div', {}, [ h('h3', {}, [ "Hello from merger!"] ) ])
}
Wrattler calls the render function with a few extra parameters. In additioon
to the MergerState value, we also get state of the code block of type
BlockState, which links the
block to the dependency graph and EditorContext,
which lets you trigger both local and global events. We will need thse later.
Implementing the language plugin interface
Finally, the main interface that each language plugin needs to implement
is the LanguagePlugin
interface. You can find detailed explanation of the individual attributes and
methods in the API documentation.
Briefly, the parse and save methods turn source code into a Block value
and vice versa; the bind operation constructs depenendecy graph for the code block
and evaluate evaluates nodes in the dependnecy graph.
In our trivial example, we don’t have any source code, so parse returns a
Block object with just the (required) language field and save returns empty
string. For bind and evaluate, we have to do a little bit of work though:
export const mergerLanguagePlugin : Langs.LanguagePlugin = {
  language: "merger",
  iconClassName: "fa fa-object-group",
  editor: mergerEditor,
  getDefaultCode: (id:number) => "",

  parse: (code:string) => { language: "merger" },
  save: (block:Langs.Block) => "",

  bind: async (context: Langs.BindingContext, block: Langs.Block) :
      Promise<Langs.BindingResult> => {
    let node:Graph.Node =
      { language: "merger",
        antecedents: [], hash: <string>Md5.hashStr("todo"),
        value: null, errors: [] }
    return { code: node, exports: [], resources: [] };
  },

  evaluate: async (context:Langs.EvaluationContext, node:Graph.Node) :
      Promise<Langs.EvaluationResult> => {
    return { kind: "success", value: { kind: "nothing" } };
  }
}
The bind operation creates a new Node,
i.e. a graph node for the dependency graph. This needs to include a couple of
required fields: antecedents is an array of other nodes that this one depends
on; value is the value or null if we have not yet evalauted the code of this
node, errors can be used for error reporting and hash should be a unique
hash calculated from the source code, so that changing the source code changes
the hash.
The evaluate operation does not do anything interesting yet. For any graph
node, it just returns success and produces a value of kind nothing, which
is our own custom value type that represents a value with no useful data.
Registering our plugin with Wrattler
As mentioned earlier, this tutorial assumes that you are directly modifying the
Wrattler source code. If you were creating Wrattler instance using the exposed
Wrattler class, then you could add the
plugin to the LanguagePlugins
dictionary before calling createNotebook. However, if we’re modifying the source
directly, the easiest option is to modify the getDefaultLanguages function in
the src/wrattler.ts file. You need to import the merger.ts file:
import { mergerLanguagePlugin } from './demo/merger'
Then, you need to add merger as one of the languages returned by
getDefaultLanguages:
getDefaultLanguages() : LanguagePlugins {
  // (other configuration omitted)
  languagePlugins["merger"] = mergerLanguagePlugin;
  return languagePlugins;
}
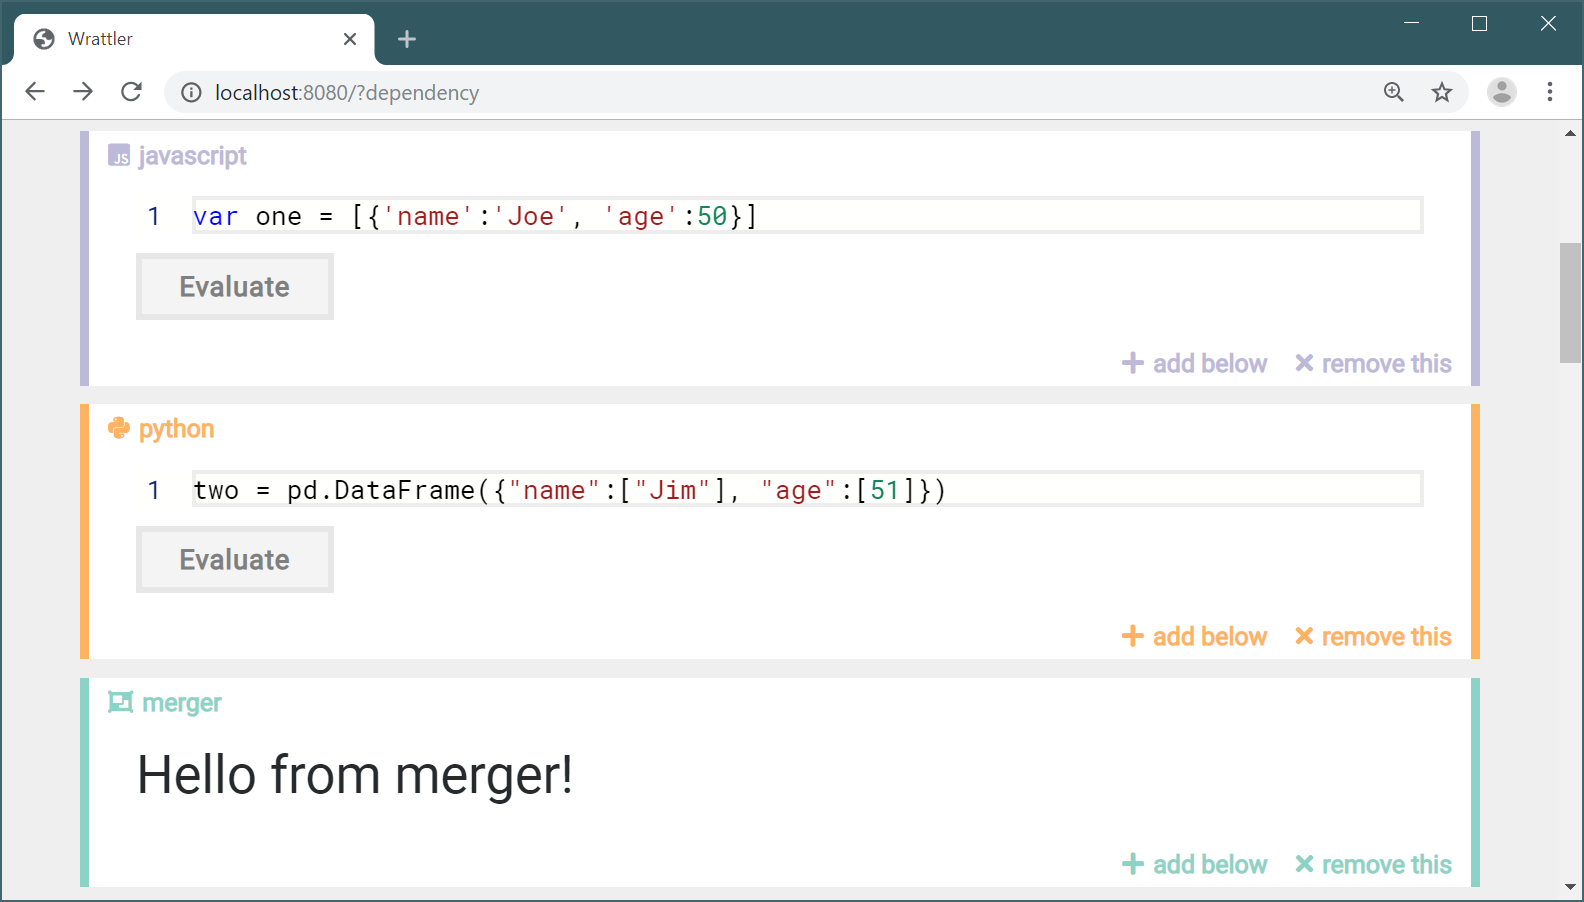
If you follow the above steps, you should be able to see “merger” as one of the options when you click the “add below” button to add a new code block. After adding a new “merger” block, you should see something along the following lines.
Step 2: Building user interface for choosing variables
In this section, we build a user interface that displays variables that are available in scope, allows user to choose some of them and also lets the user specify the name of the data frame that will be exported as a result from the code block. For now, we won’t create the correct dependency graph and we will leave out evaluation - we add those two in the next step.
Blocks and dependency graphs
The Merger plugin lets you specify the name of one output data frame and choose
from a list of input data frames. We will need a way of representing “programs”
created using the Merger plugin as strings and we’ll use a simple text format
out=in1,in2,in3.
We will also need to attach information about the input frames and output frame
name to some of the data structures that Wrattler keeps. When Wrattler parses
source code for each code block, it creates a language-specific Block value. Later,
it runs the bind operation of the language plugin to create a graph Node.
We define a new type of blocks and nodes for our plugin and store output
frame name and inputs in both. In addition, the Node will also need to remember
all data frames that are in scope (so that we can create a unchecked checkbox
for those that are not selected).
interface MergerBlock extends Langs.Block {
  language : string
  output: string
  inputs: string[]
}

interface MergerCodeNode extends Graph.Node {
  kind: 'merger.code'
  framesInScope: string[]
  output: string
  inputs: string[]
}
These two types will be used in a number of places in the LanguagePlugin
implementation. Before getting to that, we revisit the implementation of the
Editor component for our plugin.
Creating custom user interface for a plugin
As mentioned earlier, plugins that add support for text-based programming languages, rather than interactive visual tools, do not have to implement their own user interface. You can either create an external language service or you can use standard Wrattler editor component (discussed in Step 4). However, one of the nice features of Wrattler is that you can create your own user interfaces if you wish.
To implement user interface for Merger, we start by revisiting the types to represent state and events. We have two kinds of events. First, user can check or uncheck a checkbox representing input data frame. Second, user can edit the name of the output data frame. As for state, we need to keep a dictionary with selected checkboxes and the output data frame name:
type MergerCheckEvent = { kind:'check', frame:string, selected:boolean }
type MergerNameEvent = { kind:'name', name:string }
type MergerEvent = MergerCheckEvent | MergerNameEvent

type MergerState = {
  id: number
  block: MergerBlock
  selected: { [frame:string] : boolean }
  newName: string
}
We use TypeScript union type, written using | to represent events. As we’ll
see later, having kind in the object type allows us to pattern match on events
using the switch construct. For the dictionary, we use an indexable object.
Most of the work that we need to do in this step is to revisit the
implementation of the Editor
interface. The initialize operation takes MergerBlock representing the
code block and produces initial MergerState. The update operation
takes MergerState and MergerEvent and produces a new MergerState.
Note that initialize first casts the universal Block type to MergerBlock.
This will always succeed because Wrattler only calls our plugin with blocks
that have the correct language attribute and so we know that the blocks we
get will actually be MergerBlock values.
const mergerEditor : Langs.Editor<MergerState, MergerEvent> = {
  initialize: (id:number, block:Langs.Block) => {
    let mergerBlock = <MergerBlock>block
    var selected = { }
    for (let s of mergerBlock.inputs) selected[s] = true;
    return { id: id, block: mergerBlock,
      selected:selected, newName:mergerBlock.output }
  },

  update: (state:MergerState, event:MergerEvent) => {
    switch(event.kind) {
      case 'check':
        var newSelected = { ...state.selected }
        newSelected[event.frame] = event.selected
        return {...state, selected:newSelected}
      case 'name':
        return {...state, newName:event.name}
    }
  },

  render: (block:Langs.BlockState, state:MergerState,
      context:Langs.EditorContext<MergerEvent>) => {
    // (See below for the operation body)
  }
}
In initialize, we iterate over the inputs and construct the selected
dictionary. Then we create MergerState, storing a reference to the block,
its unique ID, the dictionary with selected inputs and a name for the output
data frame.
The update operation uses switch to pattern match on events. If the event
is check, we create a new dictionary of selected checkboxes. If the event is
name, we create a new state with updated newName. Note that we follow the
Elm architecture here and return a new state rather than mutating the existing
object, which can be done quite nicely using the ...state spread operator.
In principle, you could use mutation too, but that can easily lead to unexpected
bugs.
The implementation of render is not too complicated, but it is quite long,
because it creates a lot of user interface. It generates an <ul> list with
all the frames in scope and then input for specifying the new name. It also
generates two buttons - Rebind button and Evaluate button - which we will
discuss shortly.
let mergerNode = <MergerCodeNode>block.code
let source = state.newName + "=" +
  Object.keys(state.selected).filter(s => state.selected[s]).join(",")

return h('div', {}, [
  h('p', {key:"p0"},
    [ "Choose data frames that you want to merge:"] ),
  h('ul', {}, mergerNode.framesInScope.map(f =>
    h('li', { key:f }, [
      h('input',
        { id: "ch" + state.id + f, type: 'checkbox',
          checked: state.selected[f] ? true : false,
          onchange: (e) => {
            let chk = (<any>e.target).checked
            let evt = { kind:'check', frame:f, selected: chk }
            context.trigger(evt)
        }}, []),
      " ",
      h('label', {for: "ch" + state.id + f}, [ f ])
    ])
  )),

  h('p', {key:"p1"},
    ["Specify the name for the new merged data frame:"]),
  h('p', {key:"p2"}, [
    h('input', {key:'i1', type: 'text', value: state.newName, oninput: (e) => {
      let evt = { kind:'name', name:(<any>e.target).value }
      context.trigger(evt) }, []),
    h('input', {key:'i2', type: 'button', value: 'Rebind', onclick: () =>
      context.rebindSubsequent(block, source) }, []),
    ( block.code.value ? "" :
      h('input', {key:'i3', type: 'button', value: 'Evaluate', onclick: () =>
        context.evaluate(block.editor.id) }, []) )
  ])
])
The code mostly just generates HTML for the user interface using the h function.
Along the way, it uses the various information that we store in the MergerCodeNode
node, such as framesInScope and also in the state object such as the current
state of the checkboxes and current newName (used as the value of the <input>
element).
The most interesting part is how we handle different events:
-
When the user checks or unchecks an input frame or changes the output frame name, we want to remember this information, but we do not immediately notify Wrattler about this. Consequently, Wrattler does not automatically invalidate subsequent blocks (yet). This happens in the
onchangeevent of a checkbox for an input data frame and theoninputevent of the output name textbox. In those cases, we usecontext.triggerto trigger one of ourMergerEventvalues. This will call ourupdatefunction to produce new state and re-rednder the user interface. -
When the user clicks the
Rebindbutton, we want to notify Wrattler about the changes in the source code of our code block. This is done by calling thecontext.rebindSubsequentoperation. This takes the new source code, which Wrattler uses to create a new modifiedBlockobject. This operation also causes rebinding, so any results that depend on the data frame exported from our plugin might be invalidated. -
Finally, when the user clicks the
Evaluatebutton (after clickingRebind), we tell Wrattler to evaluate a part of the dependency graph corresponding to our source code. The result of this is that Wrattler calls theevaluateoperation of our language plugin and sets thevalueproperty of theNodeobject corresponding to the code block.
Passing state in language plugin
The last part of this step is to create a new implementation of the
LanguagePlugins interface which properly
propagates data using our new MergerBlock and MergerCodeNode types. To summarize,
the different operations we need work as follows:
parseturns a string containing source code intoMergerBlock. Wrattler keeps oneBlockfor each code block in a notebook.savegoes back and turnsMergerBlockinto string with the source code.bindtakes a parsedMergerBlockand producesMergerCodeNode. We will later need to create more dependency graph nodes, but for now, we just need one.evaluatetakesMergerCodeNodeand evaluates it to a value. We will skip this now, but later, we will fetch data for all the data frames and merge them into one data frame.
The following implementation of mergerLanguagePlugin adds new parse and save
functions, revises the bind operation and keeps the same evaluate method as before:
export const mergerLanguagePlugin : Langs.LanguagePlugin = {
  language: "merger",
  iconClassName: "fa fa-object-group",
  editor: mergerEditor,
  getDefaultCode: (id:number) => "",

  parse: (code:string) : MergerBlock => {
    let [outName, inputs] = code.split('=')
    return { language: "merger", output: outName,
      inputs: inputs?inputs.split(','):[] }
  },

  save: (block:Langs.Block) => {
    let mergerBlock = <MergerBlock>block
    return mergerBlock.output + "=" + mergerBlock.inputs.join(",")
  },

  bind: async (context: Langs.BindingContext, block: Langs.Block) :
      Promise<Langs.BindingResult> => {
    let mergerBlock = <MergerBlock>block
    let ml = mergerLanguagePlugin

    let ants = mergerBlock.inputs.map(inp => context.scope[inp])
    let node:MergerNode =
      { kind: 'merger.code',
        language: ml.language, antecedents: ants,
        hash: <string>Md5.hashStr(JSON.stringify(ml.save(block))),
        output: mergerBlock.output, inputs: mergerBlock.inputs,
        value: null, errors: [],
        framesInScope: Object.keys(context.scope) }

    return { code: node, exports: [], resources: [] };
  },

  evaluate: async (context:Langs.EvaluationContext, node:Graph.Node) :
      Promise<Langs.EvaluationResult> => {
    return { kind: "success", value: { kind: "nothing" } };
  },
}
The save operation stores information about input and output data frame names
as a strig in the out=in1,...,ink format and the parse operatoion splits that
and produces MergerBlock. The bind operation now creates a new MergerNode.
It sets the output and input properties to the values from the code block
object. The hash is calculated by turning the block to string and hashing
the source code.
One interesting thing about the bind method is that it uses context.scope.
This is a value of the ScopeDictionary
type, which represents all the data frames that were exported in earlier code
blocks and that are in scope. The keys of the dictionary are the names of the
data frames and the values are depedency graph nodes representing those data
frames. We use this for two things. First, we use Object.keys(context.scope)
to get a list of all data frames in scope and store this as framesInScope.
Second, we find nodes that correspond to all inputs that we want to merge,
get their graph nodes and specify those as antecedents of the node that we
are creating. This creates a dependnecy in the graph - whenever Wrattler needs
to evaluate our new node, it will know that it first needs to evaluate all the
graph nodes that we depend on.
Running the current version of the code, you should be able to add a merger code block below some other code blocks that export data frames and you should see a checkbox for each of the data frame:
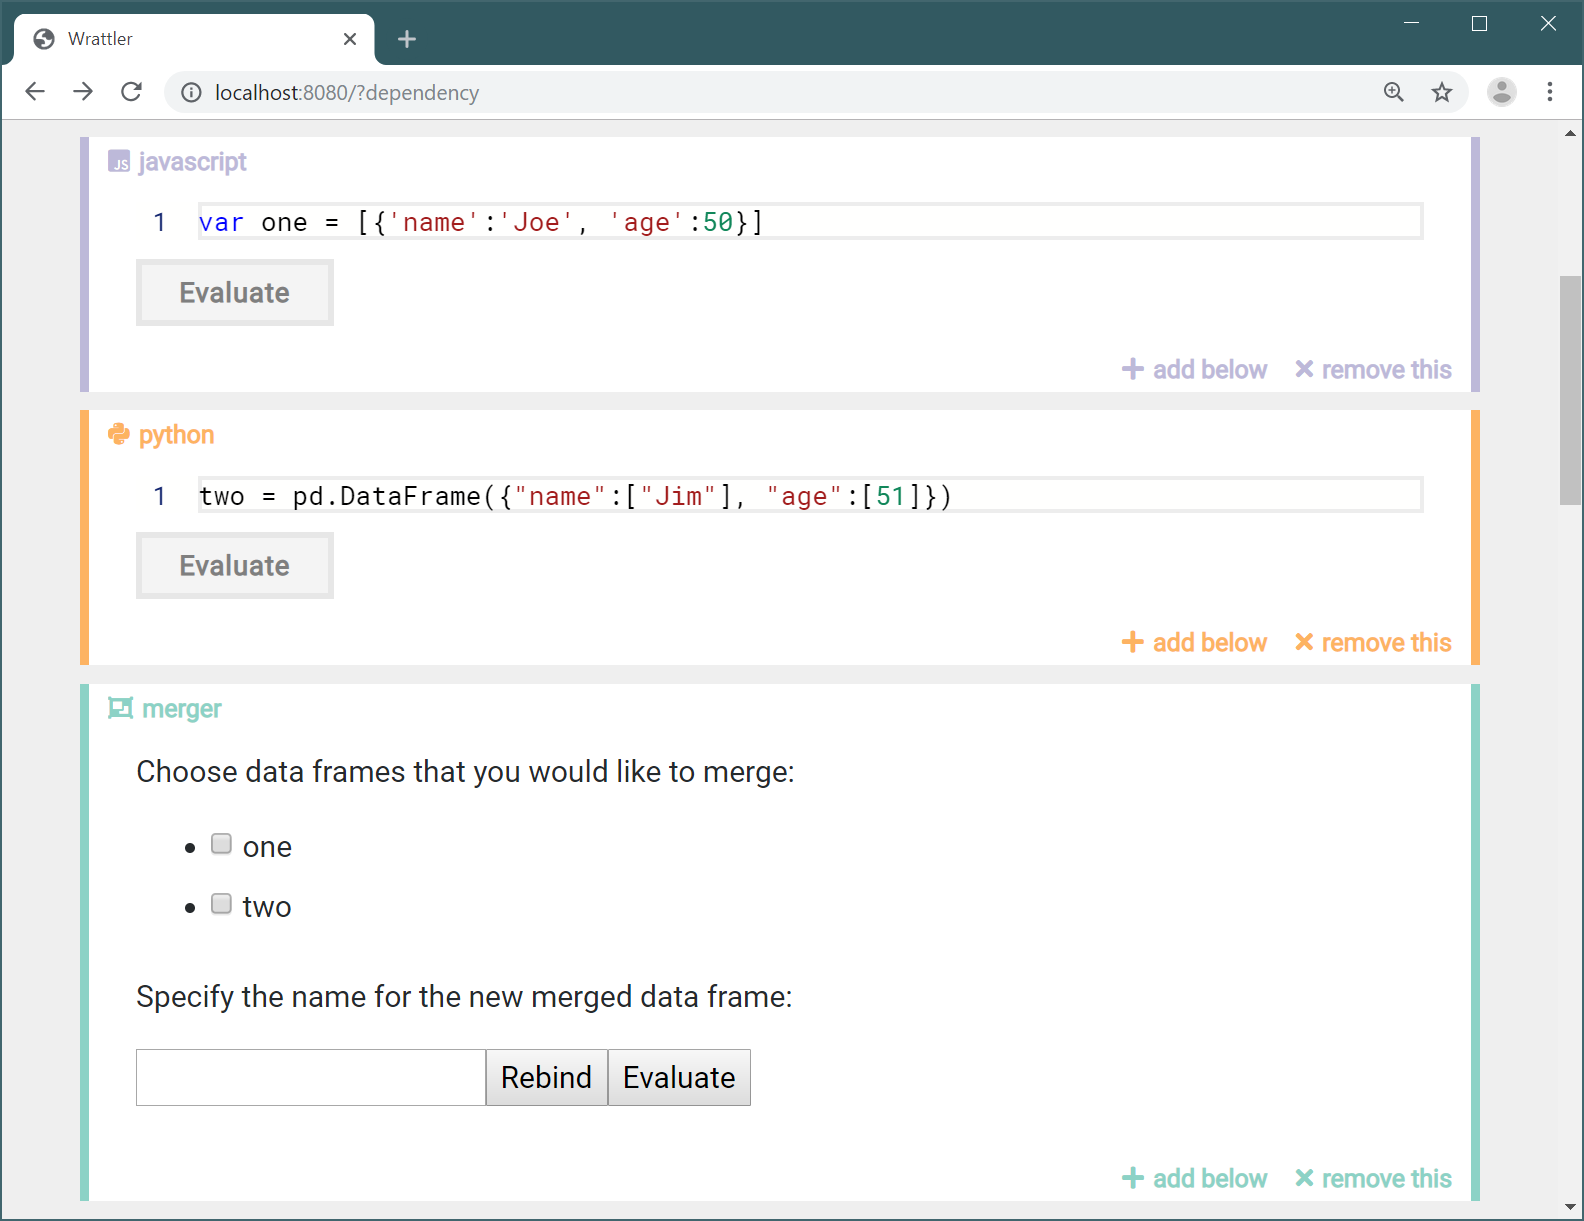
If you click the “Evaluate” button, it should disappear, because we only display it when the graph node associated to the code block is not already evaluated. If you then change the selection and click “Rebind”, it should appear again.
Step 3: Constructing and evaluating dependency graph
In the previous section, we constructed a dependency graph node for the code block. This is enough to get started, but if we want to export data frames, we need one more kind of node. We add this in the present section and we also add code to actually merge data frames.
Constructing the dependency graph
The dependency graph we need to construct will consist of two nodes - one representing
the code block and one corresponding to the newly defined variable that is exported
from the code block and will evaluate to the merged data frame. The code block node
is the MergerCodeNode that we defined earlier, but now we also add MergerExportNode,
which implements the ExportNode interface.
This represents an exported variable and additionally has variableName so that
Wrattler can add the new variable to the ScopeDictionary
and make it available to subsequent code blocks.
interface MergerCodeNode extends Graph.Node {
  kind: 'merger.code'
  framesInScope: string[]
  output: string
  inputs: string[]
}

interface MergerExportNode extends Graph.ExportNode {
  kind: 'merger.export'
  mergerNode: MergerCodeNode
}

type MergerNode = MergerCodeNode | MergerExportNode
In addition to defining MergerCodeNode and MergerExportNode, we also define
a union type MergerNode. When Wrattler invokes our language plugin to do some
work on a graph node, it will always pass us only the nodes that our language
plugin created, so we can cast them to MergerNode and then use switch to
determine which of the two kinds of nodes are we working with.
The revised binding operation creates a MergerNode in the same way as before.
Unlike before, if the user specifies output name and selects at least one input
data frame, then we also return a new MergerExportNode:
bind: async (context: Langs.BindingContext, block: Langs.Block) :
    Promise<Langs.BindingResult> => {
  let mergerBlock = <MergerBlock>block
  let ml = mergerLanguagePlugin

  let ants = mergerBlock.inputs.map(inp => context.scope[inp])
  let node:MergerNode =
    { kind: 'merger.code',
      language: ml.language, antecedents: ants,
      hash: <string>Md5.hashStr(JSON.stringify(ml.save(block))),
      output: mergerBlock.output, inputs: mergerBlock.inputs,
      value: null, errors: [],
      framesInScope: Object.keys(context.scope) }

  var exps : MergerExportNode[] = []
  if (mergerBlock.output != "" && mergerBlock.inputs.length > 0) {
    let exp: MergerExportNode =
      { kind: 'merger.export',
        language: ml.language, antecedents: [node],
        hash: <string>Md5.hashStr(JSON.stringify(ml.save(block))),
        variableName: mergerBlock.output,
        mergerNode: node,
        value: null, errors: [] }
    exps.push(exp);
  }

  return { code: node, exports: exps, resources: [] };
},
The BindingResult value that we return as the result of the bind operation
needs to include a single graph node code corresponding to the code block and
an array of exported nodes exports. This can be an empty array. In our case,
we return either empty array or an array with one exported node corresponding
to the merged data frame. The MergerExportNode that we create has the main
code block graph node code as its only antecedent (dependency) and it also
stores this as mergerNode attribute so that we can easily access it during the
evaluation.
Evaluating custom graph nodes
The evaluation will need to retrieve data from the imported data frames, append them
and create a new data frame. Wrattler stores all data that is shared between cells
in a data store, so we will also need to put the data into data store by making a
suitable HTTP request. We’ll do all this in a mergeDataFrames function that returns
a DataFrame value (as a JavaScript promise).
We’ll implement this function later and first look at the evaluate operation of the
language plugin:
evaluate: async (context:Langs.EvaluationContext, node:Graph.Node)
    : Promise<Langs.EvaluationResult> => {
  let mergerNode = <MergerNode>node
  switch(mergerNode.kind) {
    case 'merger.code':
      let vals = mergerNode.antecedents.map(n => <Values.KnownValue>n.value)
      let merged = await mergeDataFrames(mergerNode.output, mergerNode.hash, vals)
      let res : { [key:string]: Values.KnownValue }= {}
      res[mergerNode.output] = merged
      let exps : Values.ExportsValue = { kind:"exports", exports: res }
      return { kind: "success", value: exps }
    case 'merger.export':
      let expsVal = <Values.ExportsValue>mergerNode.mergerNode.value
      let expFrame = expsVal.exports[mergerNode.mergerNode.output]
      return { kind: "success", value: expFrame }
  }
}
We start by casting the provided graph node to MergerNode (which will always
work because Wrattler only calls our plugin for graph nodes that we created).
We construct two kinds of nodes, so we need to handle two cases:
-
The value of the first node, representing the whole code block is of type
ExportsValue. This keeps values of all variables that are exported from the code block. We collect all imported values by looking at node’santecedents, callmergeDataFramesand then construct a dictionary with just one key-value pair for the single exported data frame. -
The second node represents a single exported data frame, i.e. a value of type
DataFrame. Note that you can similarly export figures, console printouts or JavaScript views. In our implementation, the “exported data frame” graph node depends on the “code block” graph node and so we can get theExportsValuevalue and extract the previously evaluated data frame. In other plugins, the dependency graph can be more fine grained and using an exported variable might not require evaluating all code in the code block.
The last bit of code that we need to add is the mergeDataFrames function.
Wrattler stores data passed between code blocks in data store, which is an
HTTP service, independent of individual language plugins. This way, the data can
easily be shared between multiple languages including both services that run in the
browser and services that run as independent processes.
The DataFrame type stores url of
the data stored in a data store. For convenient way of working with it in the
browser, it also has (always available) preview with first few rows and
data, which is an AsyncLazy value - it has a method getValue which
returns a JavaScript promise that will either return the data (if it is already
available on the client) or fetch it from the data store.
We define a helper putValue that stores data in the data store and then
use it in mergeDataFrames:
declare var DATASTORE_URI: string;
import axios from 'axios';

async function putValue(variableName:string, hash:string, value:any[])
    : Promise<string> {
  let url = DATASTORE_URI.concat("/" + hash).concat("/" + variableName)
  let headers = {'Content-Type': 'application/json'}
  await axios.put(url, value, {headers: headers});
  return url
}

async function mergeDataFrames(variableName:string, hash:string,
    vals:Values.KnownValue[]) : Promise<Values.DataFrame> {
  var allData : any[] = []
  for(let v of vals) {
    if (v.kind=='dataframe')
      allData = allData.concat(await v.data.getValue())
  }

  let lazyData = new AsyncLazy<any[]>(async () => allData)
  let preview = allData.slice(0, 100)

  let url = await putValue(variableName, hash, allData)
  return { kind: "dataframe", url: url, data: lazyData, preview: preview }
}
The DATASTORE_URI variable is set by WebPack and represents the URL where the
data store service runs. To put data into the data store, we send a PUT request to
http://data-store/<hash>/<var> where <hash> is the hash of the code block
that created the data frame and <var> is the variable name. You can send data
in JSON format as array of records using application/json content type, or in
the Apache Arrow format using application/octet-stream
content type.
To merge input data frames, we create a new array allData, iterate over
all the inputs and call getValue on all inputs that are data frames. This returns
a promise, so we need to use await to get the actual data (we could do this in
parallel, but that would make the sample more complicated). We then construct
AsyncLazy value that, when called, returns the full dataset and preview
containing the first 100 rows.
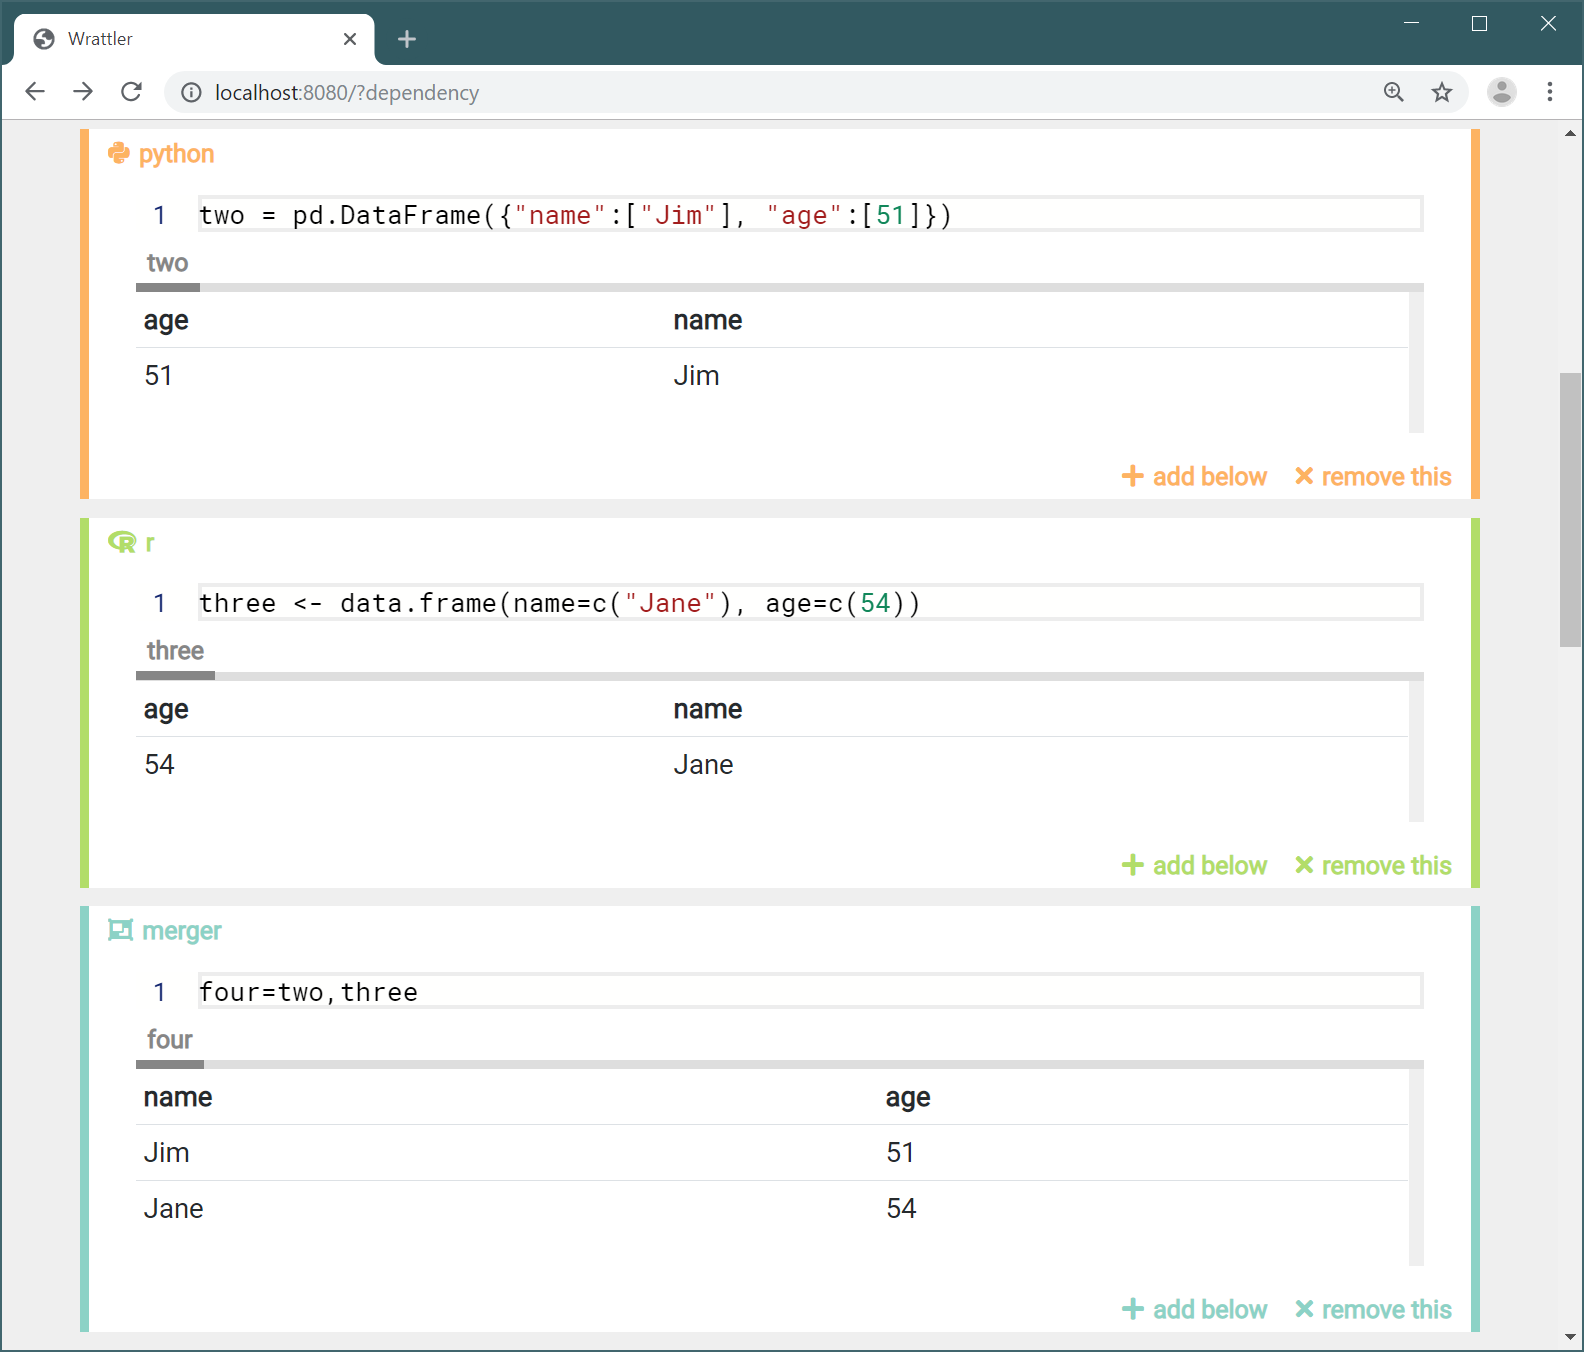
If you run the code now, you should be able to use our Merger plugin and then access the merged data frame from another language - in the following screenshot, the Python runtime (which runs as a separate service) fetches data from the data store:
Step 4: Using standard editor components
In Step 2 of this tutorial, we implemented a fully custom editor for our language plugin. This illustrates some of the capabilities of Wrattler - if you want, you can extend it with rich interactive data exploration tools. However, it is also easy to reuse some of the standard Wrattler components.
To briefly illustrate this, we can replace the earlier implementation of render
with a much simpler one that uses two functions from the
Editor module exported by Wrattler;
createMonacoEditor creates a text editor based on the Monaco editor
and createOutputPreview generates tabs that show previews of all exported
data frames, figures and console printouts.
render: (block:Langs.BlockState, state:MergerState,
    context:Langs.EditorContext<MergerEvent>) => {
  let mergerNode = <MergerCodeNode>block.code
  let source = state.newName + "=" +
    Object.keys(state.selected).filter(s => state.selected[s]).join(",")

  let evalButton = h('button',
    { class:'preview-button', onclick:() =>
        context.evaluate(block.editor.id) },
    ["Evaluate"])

  return h('div', {}, [
    h('div', {key:'ed'}, [
      Editor.createMonacoEditor("merger", source, block, context) ]),
    h('div', {key:'prev'}, [
      (block.code.value == null) ? evalButton :
        Editor.createOutputPreview(block, (idx) =>
          { }, 0, <Values.ExportsValue>block.code.value)
    ])
  ]);
}
The function creates a text editor followed by either a preview (when the block
has been evaluated) or a button that triggers the evaluation (if the value is
not set). The second and third arguments of the createOutputPreview function
are needed if the block can produce multiple outputs (and hence multiple tabs).
This is not the case for our plugin. For other plugins, you will need to keep the
selected tab index in the editor state and define an event to update it.
The second argument will be a function that triggers the event and sets the selected
tab index to idx and the third argument will be the selected index.
As you can see in the following screenshot, we can now edit the code associated
with the merger plugin directly in the text form out=in1,...,ink and when we
evaluate it, we see a preview that looks the same as previews for standard
Wrattler code blocks: